
First off I am going to apologize for not have pictures of this one. Silly me forgot to charge my camera batteries so you are going to have to trust me on the fact that this was really yummy. I was looking for something new to make with chicken (aren't we always) and I came across a Gordon Ramsey recipe for "Sticky Lemon Chicken". His recipe called for honey and I thought oh good I can use some of that yummy home made honey that a patient gave me.... Yeah could not find the honey, don't remember if it made the move with us. So I improvised and used brown sugar. Next time I will use honey instead as I think it would taste really good with the lemon. Gordon also used a whole cut up chicken, use what ever you have in the house. If you are interested in seeing Gordon's much more involved recipe search "sticky lemon chicken" on youtube.
1 10 oz chicken breast (I always butterfly one breast in half and John and I split it, use how ever much you need and just adjust the ingredients accordingly)
3 tbsp soy sauce
2 tbsp brown sugar
1 tbsp vinegar ( I used malt that's what I had handy)
2 cloves garlic chopped
1/2 lemon juiced 1/2 lemon cut into rings
Season the chicken with salt and pepper, brown in about a tsp of EVOO and remove. Add soy, sugar, vinegar, garlic and lemon juice cook for about 3 minutes until it starts to boil and reduce. Lower heat and add chicken and lemon rings back to sauce. Cook for about 5 minutes turning the chicken a few times. The sauce should be thick and sticky and coat the chicken.
I served this with roasted sweet potatoes and broccoli.
Friday, May 14, 2010
Wednesday, May 5, 2010
Guacamole
If you have never had home made guacamole you are defiantly missing out. Avocados are probably my favorite fruit, they are so rich and creamy, just really delicious. There are many different recipes out there, some people put in tomatoes (you will very rarely see me use fresh tomatoes, I do not like them at all), some people add sour cream. This is the way I like to make it.
Simple Guacamole
2 ripe Avocados
1/2 small onion diced
1/2 jalapeno pepper diced
1 lime, juiced
salt to taste

Picking out a avocado can be difficult if you do not know what to look for. First off you want a avocado with dark green skin. Next you want to gently squeeze the fruit, if you squeeze it to hard you will bruise the flesh and when you cut into it you will have brown spots. If the avocado is very soft it is over ripe and you do not want it. If it is rock hard it is not yet ripe. If you plan on using it later in the week it is OK to buy them like this and wait for them to ripen, just leave them out on the counter and check them in a few days. A perfect avocado should just give slightly when you squeeze it. If you find yourself with ripe avocados and are not ready to use them put them in the refrigerator and they will stay perfectly ripe for a few extra days.
I think another thing that deters people from eating avocados is they do not know how to cut them. Take a sharp knife and cut all the way around the avocado vertically. Twist the 2 halves and pull them apart.
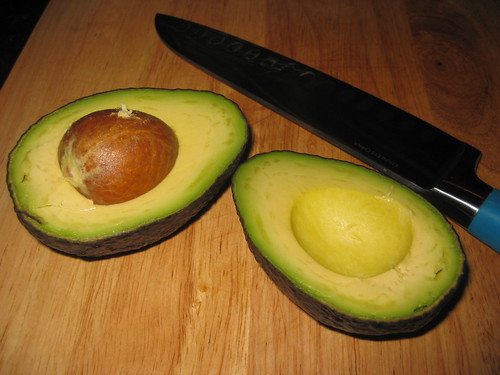
Use your knifes blade to carefully whack the seed, twist it gently and the seed should come right out.

Be very careful taking the seed off the knife, I like to use the edge of the cutting board to pull it off.
Next you want to take a spoon and scoop the avocado flesh out of the skin into a bowl. Juice your lime and pour it over the avocado, if you let the avocado sit out with out the acidic lime juice it will start to turn brown. (You can also use lemon juice instead if you prefer.)

Next chop up your onion. This is how I chop mine, cut yours in what ever way is most comfortable to you. You could even pulse it in the food processor if you want.
First cut the ends off the onion. Slice it in half and peel off the outer layer. Stand your onion half up, and carefully make horizontal cuts leaving about 1/4 - 1/2 an inch uncut at the bottom.

Next lay your onion cut half down and make vertical cuts leaving the same small amount uncut at the end.

Leaving the onion cut side down slice it horizontally and you will have a perfect diced onion.

Now for the jalapeno. I always wear gloves when I do this, I do not trust myself not to touch my eyes. If you do not have gloves make sure you wash your hands very well, rubbing lemon juice on them will help, and do not touch your eyes or your mouth. You can buy boxes of latex gloves at the hardware store, I buy mine from the beauty supply store. Start by slicing the jalapeno in half.

The real heat is in the seeds and the white membrane, you want to carefully remove these.

I use 1/2 of a jalapeno for medium heat guacamole. If you like it hot use the whole thing. If you like fire throw some seeds in. If you like it mild leave the jalapeno out completely. Simply slice the pepper vertically and then horizontally to form a small dice.

Now add everything together and throw in a generous sprinkling of salt. You do not want to leave the salt out, it pulls all of the flavors together and the guacamole would be lacking without it.

I like to mash the guacamole together with a potato masher, you can also use a fork.

Serve this with tortilla chips, on tacos, over chicken, on sandwiches you have so many options. If you were to ask my sister Leeann I bet she would say it is best served with a frosty margarita!

Simple Guacamole
2 ripe Avocados
1/2 small onion diced
1/2 jalapeno pepper diced
1 lime, juiced
salt to taste
Picking out a avocado can be difficult if you do not know what to look for. First off you want a avocado with dark green skin. Next you want to gently squeeze the fruit, if you squeeze it to hard you will bruise the flesh and when you cut into it you will have brown spots. If the avocado is very soft it is over ripe and you do not want it. If it is rock hard it is not yet ripe. If you plan on using it later in the week it is OK to buy them like this and wait for them to ripen, just leave them out on the counter and check them in a few days. A perfect avocado should just give slightly when you squeeze it. If you find yourself with ripe avocados and are not ready to use them put them in the refrigerator and they will stay perfectly ripe for a few extra days.
I think another thing that deters people from eating avocados is they do not know how to cut them. Take a sharp knife and cut all the way around the avocado vertically. Twist the 2 halves and pull them apart.
Use your knifes blade to carefully whack the seed, twist it gently and the seed should come right out.
Be very careful taking the seed off the knife, I like to use the edge of the cutting board to pull it off.
Next you want to take a spoon and scoop the avocado flesh out of the skin into a bowl. Juice your lime and pour it over the avocado, if you let the avocado sit out with out the acidic lime juice it will start to turn brown. (You can also use lemon juice instead if you prefer.)
Next chop up your onion. This is how I chop mine, cut yours in what ever way is most comfortable to you. You could even pulse it in the food processor if you want.
First cut the ends off the onion. Slice it in half and peel off the outer layer. Stand your onion half up, and carefully make horizontal cuts leaving about 1/4 - 1/2 an inch uncut at the bottom.
Next lay your onion cut half down and make vertical cuts leaving the same small amount uncut at the end.
Leaving the onion cut side down slice it horizontally and you will have a perfect diced onion.
Now for the jalapeno. I always wear gloves when I do this, I do not trust myself not to touch my eyes. If you do not have gloves make sure you wash your hands very well, rubbing lemon juice on them will help, and do not touch your eyes or your mouth. You can buy boxes of latex gloves at the hardware store, I buy mine from the beauty supply store. Start by slicing the jalapeno in half.
The real heat is in the seeds and the white membrane, you want to carefully remove these.
I use 1/2 of a jalapeno for medium heat guacamole. If you like it hot use the whole thing. If you like fire throw some seeds in. If you like it mild leave the jalapeno out completely. Simply slice the pepper vertically and then horizontally to form a small dice.
Now add everything together and throw in a generous sprinkling of salt. You do not want to leave the salt out, it pulls all of the flavors together and the guacamole would be lacking without it.
I like to mash the guacamole together with a potato masher, you can also use a fork.
Serve this with tortilla chips, on tacos, over chicken, on sandwiches you have so many options. If you were to ask my sister Leeann I bet she would say it is best served with a frosty margarita!
Monday, May 3, 2010
Wedding Cake take 1
Over the next few weeks I am going to be testing out a few different cake recipes. I am making a wedding cake in June so I have a little time to get things just right. The last wedding cake I made I used a doctored box mix. It came out good but I would like to make the cake from scratch this time.

The tricky thing about wedding cake is you want it to be moist but firm and sturdy, especially if it is being covered in fondant.
For my first test I used this recipe http://allrecipes.com/Recipe/Pound-Cake-III/Detail.aspx with a few modifications that I got from reading the reviews.
Modifications:
1 1/4 cup buttermilk instead of plain milk
1 1/2 tbsp vanilla
1 tsp lemon extract
I think one of the most important things you can do to make any baked good come out good is to cream the butter and sugar properly. When you start out the mixture will be crumbly.

You want to cream it until it is light and fluffy looking, a good 5 - 10 minutes.

While I was creaming the butter, shortening and sugar I sifted the dry ingredients.

Once the sugar mixture is light and fluffy you want to keep the mixer on low speed and add in the 5 eggs one at a time. The add in your extracts. Now what you want to do is keep the mixer on a low speed and add your dry ingredients and milk alternately starting and finishing with the dry (dry, milk, dry, milk, dry). At this point you will have a super light and fluffy cake batter.

I made this in a bunt pan (because I have not unpacked my 8' cake pans yet) and had enough batter left over to make a dozen cupcakes so I am thinking I could have easily filled around 4 8' pans.

Here is a great tip for greasing pans I learned in cake decorating class. Mix together equal parts flour and shortening to form a paste. Brush this on the inside of your cake pans and they will not sick. I use this method every time I make a cake and it has not failed me. It is extra important to grease a fluted bunt pan well.
The recipe says to cook the cake for 90 minutes. Mine was done in 60 so I would start checking it around 45 - 50 minutes, it just depends on your pan size.

Let the cake cool for about 10-15 minutes before removing from the pan.
I just mixed up some powdered sugar, a bit of milk, a drop of vanilla and lemon extract together to make a quick glaze since I was going to take this into work with me.

The verdict: This cake has allot going for it. It was moist and had a great light lemony flavor. I don't think it has the firmness I was looking for though. I will keep it in the running for now but I hope to find a recipe that has more of a pound cake texture to it.
*Edit to add:
I am changing my mind about this cake. It is on the top of my list. The cupcake that I had last night was nothing like the bunt cake I had this afternoon. After being refrigerated and taken out this was typical pound cake consistancy, moist and firm, with great flavor. This recipe does not make good cup cakes, make sure to use a bunt, loaf or cake pans.

The tricky thing about wedding cake is you want it to be moist but firm and sturdy, especially if it is being covered in fondant.
For my first test I used this recipe http://allrecipes.com/Recipe/Pound-Cake-III/Detail.aspx with a few modifications that I got from reading the reviews.
Modifications:
1 1/4 cup buttermilk instead of plain milk
1 1/2 tbsp vanilla
1 tsp lemon extract
I think one of the most important things you can do to make any baked good come out good is to cream the butter and sugar properly. When you start out the mixture will be crumbly.
You want to cream it until it is light and fluffy looking, a good 5 - 10 minutes.
While I was creaming the butter, shortening and sugar I sifted the dry ingredients.
Once the sugar mixture is light and fluffy you want to keep the mixer on low speed and add in the 5 eggs one at a time. The add in your extracts. Now what you want to do is keep the mixer on a low speed and add your dry ingredients and milk alternately starting and finishing with the dry (dry, milk, dry, milk, dry). At this point you will have a super light and fluffy cake batter.
I made this in a bunt pan (because I have not unpacked my 8' cake pans yet) and had enough batter left over to make a dozen cupcakes so I am thinking I could have easily filled around 4 8' pans.
Here is a great tip for greasing pans I learned in cake decorating class. Mix together equal parts flour and shortening to form a paste. Brush this on the inside of your cake pans and they will not sick. I use this method every time I make a cake and it has not failed me. It is extra important to grease a fluted bunt pan well.
The recipe says to cook the cake for 90 minutes. Mine was done in 60 so I would start checking it around 45 - 50 minutes, it just depends on your pan size.
Let the cake cool for about 10-15 minutes before removing from the pan.
I just mixed up some powdered sugar, a bit of milk, a drop of vanilla and lemon extract together to make a quick glaze since I was going to take this into work with me.
The verdict: This cake has allot going for it. It was moist and had a great light lemony flavor. I don't think it has the firmness I was looking for though. I will keep it in the running for now but I hope to find a recipe that has more of a pound cake texture to it.
*Edit to add:
I am changing my mind about this cake. It is on the top of my list. The cupcake that I had last night was nothing like the bunt cake I had this afternoon. After being refrigerated and taken out this was typical pound cake consistancy, moist and firm, with great flavor. This recipe does not make good cup cakes, make sure to use a bunt, loaf or cake pans.
Friday, April 30, 2010
You want me to eat what?
Brussel Sprouts, yup you heard me right Brussel Sprouts my friends. Those soggy, mushy gross smelling little cabbage like things you were forced to eat as a child. See the thing is those are the B.S. of yester year. What if I told you you could make delicious, crispy, savory morsels of goodness, you'd want to try them again right? Growing up we never ate Brussel Sprouts. It was not until I met my husband and he expressed his love for the small green orbs that I started experimenting with them. This is one of my favorite ways to eat them. I do keep the frozen ones around to microwave when I need a quick veggie, but they taste nothing like fresh ones.
The first thing you want to do with a fresh Brussel is cut a bit of the stem end off.

Then remove the first few leaves as these can sometimes be a little tough. Cut them in half and you are ready to go.

I made these on the stove top because I had other things cooking in the oven, they are just as delicious roasted in the oven. Start out with a heavy bottom skillet. Add in 1/2 cup of water and steam the sprouts for about 4 minutes. At this point most of your water will be evaporated, this is a good thing. Add in a knob of butter, a splash of balsamic vinegar and some salt and pepper. Let them cook over medium heat stirring occasionally.

The sugars in the balsamico will start to caramelize and work there sweet and yummy magic. You do not want to over cook these, no more than 10 - 12 minutes. The Brussel Sprouts will let you know that you took them too far if they start to get a sulfuric smell.

I served these with a turkey burger, they are a great side with just about anything.
If you have never been a fan of Brussel Sprouts be adventurous and try them out cooked like this. I bet the good ol' sprouts will have you on their side in no time.

The first thing you want to do with a fresh Brussel is cut a bit of the stem end off.
Then remove the first few leaves as these can sometimes be a little tough. Cut them in half and you are ready to go.
I made these on the stove top because I had other things cooking in the oven, they are just as delicious roasted in the oven. Start out with a heavy bottom skillet. Add in 1/2 cup of water and steam the sprouts for about 4 minutes. At this point most of your water will be evaporated, this is a good thing. Add in a knob of butter, a splash of balsamic vinegar and some salt and pepper. Let them cook over medium heat stirring occasionally.
The sugars in the balsamico will start to caramelize and work there sweet and yummy magic. You do not want to over cook these, no more than 10 - 12 minutes. The Brussel Sprouts will let you know that you took them too far if they start to get a sulfuric smell.
I served these with a turkey burger, they are a great side with just about anything.
If you have never been a fan of Brussel Sprouts be adventurous and try them out cooked like this. I bet the good ol' sprouts will have you on their side in no time.
Sunday, April 25, 2010
Penne with Vodka Sauce
When we go out for Italian food John always orders the "Penne alla Vodka". Recently we have been cutting back on the amount of eating out we do. With buying the house and planning a vacation it is a luxury that we cut out that saves us allot of money. If you order this from a restaurant the cost is around $12. - $15.00 easily. "Penne alla vodka" looks like it is hard to make but in reality it is very simple. Stay home and impress your hunny on a date night or invite some company over and have a dinner party. The best part about this, it is so inexpensive to make! You can feed 4 people for under $10.00, that is less than 1 meal if you were eating out. I guarantee you'll have most of the ingredients already in your pantry. And anyone you make this for will be majorly impressed and sing you praises.
Penne with Vodka Sauce
1 small onion diced
3 cloves of garlic minced
1 pinch of red pepper flakes or to taste
1 tbsp EVOO
1 tbsp butter
1 14.5 oz can Hunts fire roasted diced tomatoes (I really like the taste of these tomatoes, I keep cans in my pantry at all times. It is so much cheaper than buying jarred pasta sauce and tastes home made, you can use any kind of diced tomatoes in sauce that you like)
1 heaping tbsp tomato paste
1/4 cup vodka
1/2 cup heavy cream
1/4 cup grated Parmesan cheese
1 tbsp fresh parsley, plus some for garnish (optional)
1/2 lb penne pasta
Cook your penne in boiling salted water for about 9 minutes, make sure to remove while al dente because you will finish cooking it in the sauce. **Reserve a small amount of the pasta water.
While waiting for the pasta water to boil add EVOO to a skillet. Saute onions, garlic and red pepper flakes until translucent about 4 minutes. Add in tomatoes and paste mix well. Add in vodka and let simmer for about 5 minutes. (All of the alcohol in the vodka will cook off and you will only be left with the flavor so no you cannot get drunk off this and yes it is OK to feed to a child.)

Add the heavy cream and let the sauce simmer and reduce for additional 5 - 10 minutes. When pasta is almost done add the cheese, butter and parsley to the sauce, mix well.

Add your pasta and let it cook in the sauce for a few minutes. If your sauce is too thick add a small amount of the pasta water to thin it.

I recommend serving this with some crusty bread and a simple side salad dressed with oil and vinegar. You can also bulk this up buy adding grilled chicken or shrimp. One of John's favorite versions has sausage in it, so you can be creative and add what you like.

There are a million different recipes around, this is the one I came up with after doing allot of research and I honestly think it tastes better than anything you will get at a restaurant.

Enjoy!
Penne with Vodka Sauce
1 small onion diced
3 cloves of garlic minced
1 pinch of red pepper flakes or to taste
1 tbsp EVOO
1 tbsp butter
1 14.5 oz can Hunts fire roasted diced tomatoes (I really like the taste of these tomatoes, I keep cans in my pantry at all times. It is so much cheaper than buying jarred pasta sauce and tastes home made, you can use any kind of diced tomatoes in sauce that you like)
1 heaping tbsp tomato paste
1/4 cup vodka
1/2 cup heavy cream
1/4 cup grated Parmesan cheese
1 tbsp fresh parsley, plus some for garnish (optional)
1/2 lb penne pasta
Cook your penne in boiling salted water for about 9 minutes, make sure to remove while al dente because you will finish cooking it in the sauce. **Reserve a small amount of the pasta water.
While waiting for the pasta water to boil add EVOO to a skillet. Saute onions, garlic and red pepper flakes until translucent about 4 minutes. Add in tomatoes and paste mix well. Add in vodka and let simmer for about 5 minutes. (All of the alcohol in the vodka will cook off and you will only be left with the flavor so no you cannot get drunk off this and yes it is OK to feed to a child.)
Add the heavy cream and let the sauce simmer and reduce for additional 5 - 10 minutes. When pasta is almost done add the cheese, butter and parsley to the sauce, mix well.
Add your pasta and let it cook in the sauce for a few minutes. If your sauce is too thick add a small amount of the pasta water to thin it.
I recommend serving this with some crusty bread and a simple side salad dressed with oil and vinegar. You can also bulk this up buy adding grilled chicken or shrimp. One of John's favorite versions has sausage in it, so you can be creative and add what you like.
There are a million different recipes around, this is the one I came up with after doing allot of research and I honestly think it tastes better than anything you will get at a restaurant.
Enjoy!
Friday, April 23, 2010
Stuffed Pork Chops
Wednesday was a pretty interesting day for the Maple household. I was elected April's employee of the month at the hospital that we work at and they were having a celebration with all of the big wigs, my co workers and my family. Things did not turn out how they were planed however. Some time Wednesday mid-morning the McAfee virus software on all of the hospitals computers updated and made all of the computers crash in all 5 of the Lifespan hospitals. Apparently McAfee had a corrupted file that said a vital part of windows was a virus... Yes the virus software people created their own virus. To make a long story short the celebration was rushed along with plans to reschedule for sometime next week. And my husband was stuck up in the Lab "putting out fires" and running around like a chicken with his head cut off. He ended up putting in a 15 hour day and I knew he would be really hungry when he got home. I had defrosted some nice thick cut pork chops and wanted to try something new so I went to my tried and true allrecipes and decided on this:
http://allrecipes.com/Recipe/Stuffed-Pork-Chops-III/Detail.aspx
Here are the modifications I made:
2 thick cut pork chops
1/4 cup seasoned panko bread crumbs
1/2 of a small onion diced
approximately 1 tsp of melted butter
garlic powder, salt and pepper
I had not planned on blogging this, once I saw how delicious the chops looked I knew I had to though, so I don't have any pictures of the stuffing process but it was not hard. Just make a slit in the center of the chop big enough to stuff but not all the way through, stuff with about 1/8 of a cup of the filling and close with a few tooth picks. I did not sear the chops in butter like the recipe called for I used evoo. Brown the chops on both sides and then add in the beef broth. I used 1 tsp of "better than bouillon" with 1 1/2 cups of water.
(This is a great product to have around, I buy mine at Shaws. You can read about it here:
http://www.superiortouch.com/retail/products/better-than-bouillon/premium-bases/30/beef-base )

I simmered the chops in the broth on low heat for about 15 minutes per side. While they were simmering I made some roasted sweet potatoes and onions that I seasoned with a dash of cinnamon and a sprinkling of sea salt.

For something so simple to throw together these pork chops were so tasty, juicy and delicious!
The most important part is John really enjoyed coming home to this meal after a long day of work. I will definitely be making these pork chops again soon!
http://allrecipes.com/Recipe/Stuffed-Pork-Chops-III/Detail.aspx
Here are the modifications I made:
2 thick cut pork chops
1/4 cup seasoned panko bread crumbs
1/2 of a small onion diced
approximately 1 tsp of melted butter
garlic powder, salt and pepper
I had not planned on blogging this, once I saw how delicious the chops looked I knew I had to though, so I don't have any pictures of the stuffing process but it was not hard. Just make a slit in the center of the chop big enough to stuff but not all the way through, stuff with about 1/8 of a cup of the filling and close with a few tooth picks. I did not sear the chops in butter like the recipe called for I used evoo. Brown the chops on both sides and then add in the beef broth. I used 1 tsp of "better than bouillon" with 1 1/2 cups of water.
(This is a great product to have around, I buy mine at Shaws. You can read about it here:
http://www.superiortouch.com/retail/products/better-than-bouillon/premium-bases/30/beef-base )
I simmered the chops in the broth on low heat for about 15 minutes per side. While they were simmering I made some roasted sweet potatoes and onions that I seasoned with a dash of cinnamon and a sprinkling of sea salt.
For something so simple to throw together these pork chops were so tasty, juicy and delicious!
The most important part is John really enjoyed coming home to this meal after a long day of work. I will definitely be making these pork chops again soon!
Wednesday, April 21, 2010
Chicken Tacos
If you are a fan of South Park like me now is the time to sing the “Jennifer Lopez, Taco flavored kisses” song. Go ahead, I’ll wait... taco taco burrito burrito… Now that we got that out of the way lets get to the good stuff ~ Chicken Tacos! Up until a few years ago the only kind of tacos I ever made were the out of the box kind. When we went to California to visit Johns family his Grandma taught me how she makes tacos. Since Grandma is the kind of cook that throws in a little of this and a little of that (there is nothing wrong with that) I took the basics of her taco seasoning added some stuff and made it consistent. Most of the time I make this with ground beef, today I used chicken. The first thing I did was boil a chicken breast. Mine was large, almost 1 lb, and still frozen so I cooked it for about 1/2 hour. When it was cooked through I let it cool down for about 10 minutes, then shredded the meat. Add it to a pan with 1 cup of water and the taco seasoning. Cook on low for about 10 - 15 minutes and you will have some pretty killer chicken on your hands.

Amy's Basic Taco Seasoning
2 tsp chili powder
1 tsp paprika
1 tsp cumin
1 tsp garlic powder
1 tsp onion powder
1 tsp seasoning salt
1/2 tsp sugar
1/4 tsp cayenne pepper (or to taste)
1/2 bouillon cube (I use Goya chicken tomato because that's what Grandma does)
You have some decisions to make with your taco shells. You can use the boxed kind. You can use flour tortillas if you like soft tacos. Or you can go the Grandma way and use "fresh" corn tortillas. You can find these in the ethnic food section.

Add enough oil to the pan to cover the bottom (corn, canola, vegetable something neutral NOT olive oil). Put your burner on medium high and let the oil heat up. Add the corn tortilla let it sit for about 10 seconds, flip it over and fold it in half. Be very careful not to splatter oil on yourself.

I would start out with 1 tortilla at first and when you get the hang of it you can do 2 at a time. You cook the shells depending on how crispy you like your tacos, I usually do mine for about 30 - 45 seconds per side. Never walk away from the stove unless you want them to burn. It will take 10 minutes max for you to cook all of the shells. Once you have your desired crispness remove the shell from the pan and place it on a plate covered with paper towels. I prep my toppings while the meat is cooking so as soon as the shells are done we are ready to eat. You should not make these in advance as they are best served right away, letting them sit will make them soggy. I like sour cream, cheese, lettuce, onions and hot sauce on mine, the great thing is you can just set out the toppings and everyone can make to them to their liking.

Its defiantly worth the few extra minutes it takes to make these tacos from scratch. Trust me when I say that everyone who eats them will be very grate full :)
Amy's Basic Taco Seasoning
2 tsp chili powder
1 tsp paprika
1 tsp cumin
1 tsp garlic powder
1 tsp onion powder
1 tsp seasoning salt
1/2 tsp sugar
1/4 tsp cayenne pepper (or to taste)
1/2 bouillon cube (I use Goya chicken tomato because that's what Grandma does)
You have some decisions to make with your taco shells. You can use the boxed kind. You can use flour tortillas if you like soft tacos. Or you can go the Grandma way and use "fresh" corn tortillas. You can find these in the ethnic food section.
Add enough oil to the pan to cover the bottom (corn, canola, vegetable something neutral NOT olive oil). Put your burner on medium high and let the oil heat up. Add the corn tortilla let it sit for about 10 seconds, flip it over and fold it in half. Be very careful not to splatter oil on yourself.
I would start out with 1 tortilla at first and when you get the hang of it you can do 2 at a time. You cook the shells depending on how crispy you like your tacos, I usually do mine for about 30 - 45 seconds per side. Never walk away from the stove unless you want them to burn. It will take 10 minutes max for you to cook all of the shells. Once you have your desired crispness remove the shell from the pan and place it on a plate covered with paper towels. I prep my toppings while the meat is cooking so as soon as the shells are done we are ready to eat. You should not make these in advance as they are best served right away, letting them sit will make them soggy. I like sour cream, cheese, lettuce, onions and hot sauce on mine, the great thing is you can just set out the toppings and everyone can make to them to their liking.
Its defiantly worth the few extra minutes it takes to make these tacos from scratch. Trust me when I say that everyone who eats them will be very grate full :)
Subscribe to:
Posts (Atom)